

Outdoor Foundation Drainage System

Dual Drainage System
This homeowner has sump pumps and gutters collected into one system moving all water away from the foundation.
DIY House Drainage System: Connecting Gutters to Keep Water Away from Your Foundation
For homeowners, protecting your foundation from water damage is critical to maintaining the structural integrity of your home. A well-designed drainage system, integrated with your gutter system, can efficiently channel rainwater away from your foundation, preventing costly repairs down the line. This blog post is tailored for the DIY enthusiast, walking you through the steps to create an effective house drainage system that connects to your gutters. Let’s dive in with practical tips, tools, and a step-by-step guide to get the job done right.
Why Proper Drainage Matters
Excess water pooling around your home’s foundation can lead to cracks, mold growth, and even structural failure over time. Gutters collect rainwater from your roof, but without a proper drainage system, that water can still end up too close to your house. By extending your gutter system with a drainage solution, you ensure water is directed far enough away—ideally 5-10 feet from the foundation—to keep your home safe and dry.
Tools and Materials You’ll Need
Before starting, gather these essentials:
Tools: Shovel, level, measuring tape, hacksaw, drill, screwdriver, wheelbarrow (for dirt), and work gloves.
Materials:
Gutter downspout extensions (PVC or aluminum).
Corrugated drainage pipe (4-inch diameter is common) or PVC pipe.
Pipe connectors, elbows, and adapters.
Splash blocks or pop-up emitters.
Gravel or crushed stone.
Landscape fabric (to prevent clogging).
Concrete mix (optional for securing components).
Safety Gear: Safety glasses, sturdy boots, and a dust mask.
Pro Tip: Check local building codes before starting, as some areas have regulations on drainage systems, especially if you’re connecting to a municipal storm drain.
Step-by-Step Guide to Building Your Drainage System
Step 1: Plan Your Drainage Path
Start by observing how water flows around your home during rain. Identify low spots where water pools and determine where you can safely direct the runoff (e.g., a dry well, grassy area, or street drain). The goal is to move water at least 5-10 feet away from your foundation with a slight slope (about 1 inch per foot) to ensure proper flow.
Sketch a layout: Map out where your downspouts are and where the drainage pipes will run. Avoid areas with underground utilities—call 811 to check for lines before digging.
Measure the distance: Calculate how much piping you’ll need from each downspout to the discharge point.
Step 2: Connect Gutters to Downspout Extensions
Your gutters likely already have downspouts, but you’ll need to extend them to feed into the drainage system.
Attach a downspout adapter: Use a hacksaw to cut the downspout if needed, then secure an adapter (PVC or corrugated) with screws to connect it to your drainage pipe.
Add an elbow joint: At the base of the downspout, attach a 90-degree elbow to direct water horizontally toward your drainage path.
Step 3: Dig the Drainage Trench
Now it’s time to create a trench for your underground drainage pipe.
Mark the path: Use spray paint or stakes to outline the trench from the downspout to the discharge point.
Dig the trench: Aim for a depth of 12-18 inches and a width of about 6 inches. Maintain a consistent slope (use a level to check) to prevent water from pooling in the pipe.
Remove debris: Clear rocks and roots to ensure smooth pipe installation.
Step 4: Install the Drainage Pipe
Choose between corrugated pipe (flexible and affordable) or PVC pipe (durable but requires precise cuts).
Lay landscape fabric: Line the trench with fabric to prevent soil and debris from clogging the pipe over time.
Add gravel base: Spread 1-2 inches of gravel in the trench to stabilize the pipe and improve drainage.
Place the pipe: Connect the pipe to the downspout adapter and lay it in the trench, ensuring it slopes toward the discharge point. Use connectors or elbows as needed to navigate corners.
Test the flow: Pour water through the downspout to confirm the pipe directs water correctly.
Step 5: Add a Discharge Point
The discharge point is where water exits the system. Common options include:
Splash block: Place a concrete or plastic splash block at the pipe’s end to disperse water onto a sloped lawn.
Pop-up emitter: Install a pop-up emitter for a cleaner look—it releases water when full and closes when dry.
Dry well: For larger volumes of water, dig a deeper hole (2-3 feet), fill it with gravel, and direct the pipe into it for slow absorption.
Step 6: Backfill and Secure
Once the system is in place, cover the pipe with more gravel (up to 2 inches below ground level), fold the landscape fabric over the gravel, and backfill with soil. Tamp down the soil and reseed with grass if needed. For added stability, you can pour a small concrete pad around downspout connections or emitters.
Step 7: Test and Maintain
Run a hose through your gutters to simulate heavy rain and check for leaks, clogs, or pooling. Adjust the slope or connections if necessary. To keep the system working:
Clean gutters and downspouts twice a year.
Inspect pipes for debris buildup annually.
Ensure the discharge point remains clear of leaves and dirt.
Common Mistakes to Avoid
Ignoring slope: A flat pipe traps water, leading to clogs or backups.
Skimping on materials: Cheap pipes may crack under freeze-thaw cycles.
Discharging too close: Water should exit at least 5 feet from the foundation to prevent seepage.
Forgetting maintenance: Neglected gutters and pipes can undo all your hard work.
Budget-Friendly Tips
Reuse existing downspouts if they’re in good condition.
Opt for corrugated pipe over PVC for simpler installation and lower cost.
Shop for materials at local hardware stores or online during seasonal sales.
Final Thoughts
Building a house drainage system tied to your gutters is a rewarding DIY project that protects your home and boosts your property’s longevity. With careful planning, the right tools, and a weekend of work, you can create a system that keeps water far from your foundation. Plus, you’ll gain the satisfaction of tackling a practical home improvement project yourself.
Ready to get started? Grab your shovel, double-check your measurements, and take control of your home’s water flow. If you run into challenges or have questions, drop a comment below—I’m happy to help troubleshoot!
Disclaimer: Always consult local regulations and consider hiring a professional for complex drainage issues or if you’re unsure about any step.
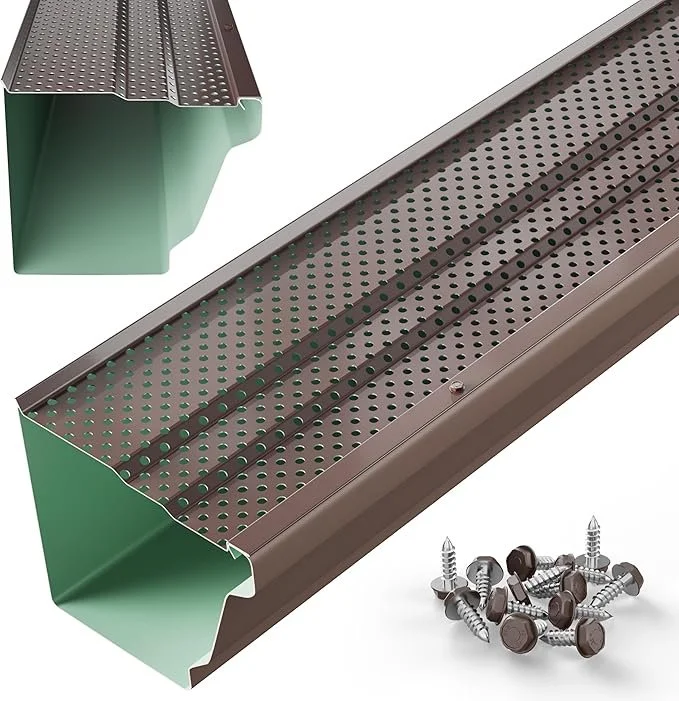
Gutter Guards
Designed to fit seamlessly with existing gutters, they allow rainwater to flow through while blocking larger debris, ensuring your drainage system operates efficiently.
Benefits:
Reduced Maintenance: Gutter guards significantly cut down on the need for frequent gutter cleaning by keeping debris out, saving you time and effort.
Prevent Clogs: By blocking leaves and twigs, they help maintain proper water flow, reducing the risk of backups that can damage your roof or foundation.
Protect Your Home: Unclogged gutters prevent water overflow, safeguarding your foundation, siding, and landscaping from water damage.
Extend Gutter Lifespan: Less debris means less corrosion and wear, prolonging the life of your gutter system.
Pest Prevention: Guards deter birds, rodents, and insects from nesting in your gutters.
Improved Safety: Fewer cleanings mean less time on ladders, reducing the risk of falls for DIY enthusiasts.
Year-Round Performance: Many guards are designed to handle heavy rain, snow, and ice, ensuring functionality in all seasons.
Installing gutter guards is a smart investment for any homeowner looking to simplify maintenance and protect their property from water-related issues.